
Your EasyWP site works, but you have read about Cloudflare's speed and its DDoS protection, and you want the extra layer — then you stop cold in front of nameservers, orange clouds, SSL modes, and DNSSEC, wondering where to start without taking your site down for even a minute. This technical guide, written August 22, 2026, walks you from zero to a domain running behind Cloudflare, in numbered steps sourced from the official Cloudflare documentation and the official EasyWP page, both verified today, complete with an SSL-mode table and fixes for the common errors that stall beginners.
💬 Disclosure: Some links in this article are affiliate links. We may earn a small commission when you complete a purchase at no extra cost to you. This helps us keep our content free, and it does not affect the integrity of our recommendations.
Before you start: what Cloudflare adds on top of what you already have
The expectation-setting point before any button is pressed: an EasyWP site already ships with a free CDN — Namecheap's own content delivery network, caching and serving your content from servers around the world — plus a free Let's Encrypt SSL certificate on every plan. So if the question is "do I need Cloudflare?", the honest answer is: it is an optional additional layer, not a required replacement. What Cloudflare genuinely adds: a wider reverse-proxy edge network, DDoS absorption before traffic ever touches your origin, customizable firewall rules, DNS management independent of your host, and granular cache and redirect controls. Who needs that? Sites targeted by attacks, sites with a broad international audience, and owners who want the freedom to change hosts later without touching their domain's DNS — and if you are still choosing a host altogether, start with the official EasyWP page or our beginner's guide to EasyWP.
Conceptually, understand the reverse proxy before implementing it: once Cloudflare is active on your domain, visitors no longer connect to your server directly. They reach the nearest Cloudflare edge location, which fetches content from EasyWP, caches it, and blocks malicious requests. Cloudflare documents this flow with its official reverse-proxy diagram in the "how Cloudflare works" guide — and once that mental model is in place, the orange cloud, the gray cloud, and the SSL modes below all become obvious.
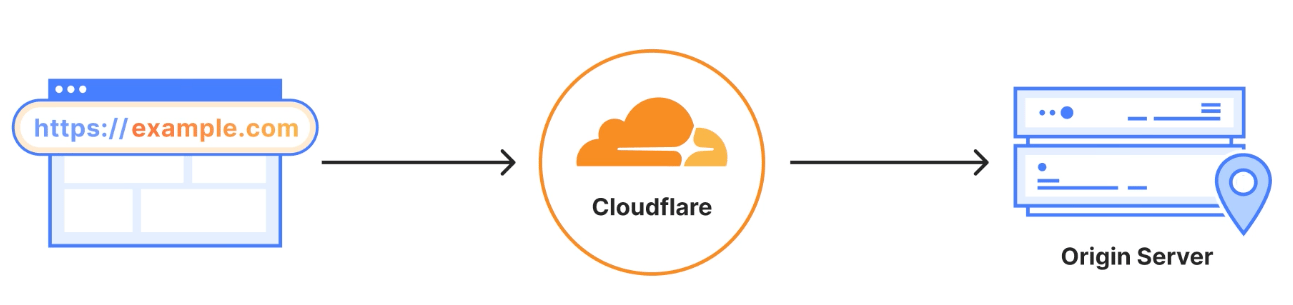
Source: Official Cloudflare documentation
What you need ready before step one
A five-item checklist that saves you from stopping halfway: one, a working EasyWP site reachable from your current domain (or on the free temporary subdomain EasyWP assigns every new site). Two, a paid domain and knowledge of which registrar controls it — if it sits at Namecheap you will manage everything from one account, and if you do not own a domain yet, our step-by-step guide to buying a domain from Namecheap covers it, or read the domain-versus-hosting explainer first if the concepts blur together. Three, login access to that registrar account for the nameserver change. Four, a free Cloudflare account — the Free plan fully supports everything in this guide, because full-setup availability is identical across the Free and Pro plans per the official documentation. Five, your site's current DNS records at hand — the next section explains exactly where they come from.
One EasyWP-specific note: the service supports domains from any provider — the official wording is "support for any domain name provider" — and the connection itself happens inside the EasyWP dashboard, which displays the record values your account needs (an A address or a CNAME value) when you add the domain. This guide deliberately invents no fixed values because they differ account to account; the golden rule is that the values shown in your EasyWP dashboard are the only correct source for your records. And one timing tip that saves waiting: if your registrar allows it, lower the TTL on your existing records to the minimum (five minutes at most registrars) a day before the switch — any correction you need after activation will then propagate in minutes rather than hours.

Source: Official Namecheap EasyWP
Step 1: Add your domain to Cloudflare and pick the plan
Log in to the Cloudflare dashboard and choose to onboard a domain, entering your root domain without www and without https — example.com, not www.example.com. Cloudflare will propose a plan; choose Free for this workflow, as everything in this guide runs on it completely. Cloudflare then performs an automatic quick scan of the DNS records currently at your registrar and attempts to copy them over. The scan takes about a minute and usually catches the common records, but the official documentation explicitly warns that the quick scan "is not guaranteed to catch everything" — which is why the next step is not optional. It is the heart of the whole operation.
Step 2: Review your DNS records before touching anything
Open the DNS records page in your new Cloudflare zone and compare it against what should exist. The rule: every record working today at your registrar must appear here, or you will silently cut a service the moment the domain activates. The reference checklist from the official docs: the root record (A, AAAA, or CNAME depending on what your EasyWP dashboard displays — this is the record pointing your domain at your site), the www record (usually a CNAME pointing at the root), and the mail records if you run email on this domain: MX for delivery, plus SPF, DKIM, and DMARC for authentication and anti-spoofing. If a record is missing, add it manually with the exact values from your registrar's panel before continuing.
Why is this review mandatory? Because the official documentation warns verbatim: activating a domain on Cloudflare before its DNS records are correctly configured leads to errors from the DNS_PROBE_FINISHED_NXDOMAIN family — the domain is "active" but resolves to nothing, showing your visitors a name-resolution failure. Five minutes of comparison spares you an hour of diagnosis and complaining-visitor messages. When in doubt about an old mail or verification record whose purpose you do not recognize: copy it across rather than deleting it — a silent record is kinder than a broken service.
Step 3: Disable DNSSEC first, then change the nameservers
This step is the actual switchover that moves DNS management from your registrar to Cloudflare, and Cloudflare officially documents its sequence in five moves: (3.1) from the Cloudflare Overview page, copy the two nameservers assigned to your account — every account receives a unique pair ending in cloudflare.com with a distinctive prefix, so never copy nameserver names from someone else's article. (3.2) Log in to your domain registrar. (3.3) Disable DNSSEC at the registrar before anything else — this specific point is what hangs activation for many: the old signing records contradict the new nameservers, and the domain refuses to activate. (3.4) Replace the registrar's default nameservers with the pair copied from Cloudflare, and save. (3.5) Wait for verification.
At Namecheap as registrar, the general path is: from the Domain List, select your domain, find the Nameservers section, switch the option to "Custom DNS," and enter the two assigned nameservers. We describe the path generally as account interfaces label it; the authoritative sequence is the one in Cloudflare's official documentation (last updated July 29, 2026), which applies regardless of your registrar. Activation time runs from minutes up to 24 hours depending on global nameserver propagation, and Cloudflare emails a "Success" notification when it completes. Then — and almost everyone misses this — re-enable DNSSEC, but from the Cloudflare side this time: under DNS, then Settings, enable signing, and add the DS record Cloudflare displays back at your registrar. That sequence gives you encryption from the new side with zero conflict.
Step 4: Set the SSL mode to Full (strict) — nothing else
The moment the domain activates, go to SSL/TLS, then Overview, and choose the mode. The correct answer for an EasyWP site: Full (strict). Why exactly? Because the free Let's Encrypt certificate installed on your EasyWP site is a valid certificate from a public certificate authority, and Full (strict) validates the origin certificate on every connection — the highest level of the two modes Cloudflare officially recommends — while remaining fully compatible with your setup, since its only requirement (a valid certificate or one issued by a public CA such as Let's Encrypt) is already satisfied. This table summarizes the three modes:
| Mode | Visitor → Cloudflare | Cloudflare → your site | Right for EasyWP? |
|---|---|---|---|
| Flexible | Encrypted | Not encrypted | No — causes redirect loops |
| Full | Encrypted | Encrypted, no origin certificate check | Works, weaker |
| Full (strict) | Encrypted | Encrypted + origin certificate validated | Correct choice — Let's Encrypt present |
The fatal mistake here is choosing Flexible "because it looks simpler": with it, the visitor's request arrives encrypted at Cloudflare and leaves unencrypted toward EasyWP, and WordPress — knowing its own SSL is active — answers with a redirect to https, the request repeats, and the visitor lands in the famous "Too many redirects" loop. The practical rule: with EasyWP, select Full (strict) from the first minute and leave the modes alone until you understand their effects. If you inherited a site with no origin certificate at all (not the EasyWP case), Flexible is a temporary bridge until a certificate is installed — then switch immediately.
One operational note after setting the mode: run a single Purge Everything from the Caching section, because stale cached copies from the previous mode's era can serve visitors content inconsistent with the new setting. The minute the purge takes saves you support tickets explaining "it works for me but not for them."
Step 5: Orange cloud versus gray cloud — when traffic flows through Cloudflare
On the DNS records page, each record carries a colored cloud icon, and its meaning is officially documented: orange = the record is proxied, so its traffic passes through the Cloudflare network with its caching and protection; gray = DNS only, the record resolves to its true value and visitors connect directly without passing through the network. The practical recommendation for beginners: start with the main records (root and www) gray until you confirm everything works after the nameserver change — the site opens, mail delivers, general access is healthy — then switch the orange cloud on record by record, testing after each switch. This staged approach separates activation errors from proxy errors: a problem after the gray-cloud verification points to DNS records, and a problem after turning orange points to SSL or cache settings — a split that halves diagnosis time.
A mail note: MX records always stay gray (mail does not pass through an HTTP proxy), as does any TXT verification record. The orange cloud only makes sense on A, AAAA, and CNAME records serving a website or web service.
Common errors and their fixes: from visitor messages to dashboard checks
The quick-diagnosis table covering the recurring failure patterns when connecting EasyWP to Cloudflare:
| Visible error | Most likely cause | Step-by-step fix |
|---|---|---|
| DNS_PROBE_FINISHED_NXDOMAIN | Domain activated before DNS records were complete | Open the DNS page: complete the root and www records with your EasyWP dashboard values; allow minutes for propagation |
| Too many redirects loop | SSL mode set to Flexible | Change the mode to Full (strict) under SSL/TLS, then run Purge Everything from Caching |
| Activation pending past a day | DNSSEC was enabled at the registrar before the switch | Disable DNSSEC at the registrar, wait an hour, re-check activation in the Cloudflare dashboard |
| Mail stopped after connecting | MX records were not copied across | Add MX, SPF, and DKIM records manually with your mail provider's values; keep them gray |
| Site works then "disappears" for hours | A middle cache layer serving an old copy | Purge Everything after every major change; optionally enable Always Online |
The unifying diagnostic rule: first determine whether the problem appeared after "the nameserver change" or after "turning the orange cloud on," then start from the matching row — eighty percent of stalls live in these five rows. Two free tools complete the kit: any public DNS checker tells you whether your domain's management actually moved to Cloudflare or still points at the old registrar, and an incognito browser window tests results away from your own device cache — half of all "the error still shows" reports are browser cache, not settings, and patience with propagation handles the other half.
A worked example: one full connection from start to finish
To fix the steps in memory with a realistic pattern: Yousef Al-Hamadi, a photographer in Dubai, had his portfolio on EasyWP for months with the domain registered at Namecheap. After reading about a wave of attacks targeting regional photographers' sites, he wanted the protection layer before the December booking season. He began with the checklist: working site, known registrar, credentials ready. He created a free Cloudflare account, added his domain, and reviewed the copied records — found a missing www record and added it manually, with the SPF record for his mail preserved untouched. He disabled DNSSEC at Namecheap (it had been on without his noticing), replaced the nameservers with the assigned pair from the Overview page, and went to bed. Next morning: the activation success email.
Then came the ordering this guide recommends: he set both clouds gray temporarily and confirmed the site and mail worked — they did for a full hour — then enabled orange on the root and www, set SSL to Full (strict), and ran Purge Everything. Over the following weeks the results held: response times for his East-Asian visitors (an important client segment) measurably improved, the exploitation attempts visible in Cloudflare's analytics arrived blocked rather than landing, and his EasyWP dashboard changed not one pixel — he manages WordPress exactly as before, the new layer entirely transparent to his daily workflow. The whole operation took about half an hour of real work spread across one day, most of it propagation waiting; done a second time it would take fifteen minutes. The table above is everything he learned the hard way.
Do you even need Cloudflare? An honest decision scale
After all the technical detail, the base question deserves a straight answer. If your site is new, lightly visited, and locally focused, the Namecheap CDN already built into EasyWP covers your needs, and any extra layer is complexity without measurable return — you can always add it later using these same steps with no penalty. If your site serves a wide international audience, has been attacked or probed before, or you want DNS management independent of your host for future flexibility, the layer is worth its half hour. Between those poles, growth decides: watch your traffic sources monthly — the day international visitors pass a quarter of your traffic, or the first exploitation attempt shows in your logs, is the day this guide becomes due.
And because total performance is never one layer: before stacking services on top of hosting, make sure the base plan itself is right — see our EasyWP Starter plan review if you are on the entry tier, the Turbo plan review for when upgrading pays, and the EasyWP vs shared hosting vs WP Engine comparison if you are at the original choice stage. Layers get built on a correct foundation; they do not replace a wrong one.
Questions searchers ask before connecting
How do I connect my EasyWP site to Cloudflare?
In brief: connect your domain to the EasyWP site from the dashboard and keep the record values it displays, add the domain at Cloudflare and review the copied records, disable DNSSEC at your registrar and change the nameservers to the assigned pair, then after activation set SSL to Full (strict) and enable the orange cloud. The detailed numbered steps with official sources sit above.
Should I change my nameservers to Cloudflare for EasyWP?
Yes — the full nameserver setup is the only official setup available on the Free and Pro plans per Cloudflare's documentation: DNS management moves to them via the nameserver change at your registrar. There is no partial "CNAME-only" option on the free tier. Remember to disable DNSSEC at the registrar before the change, then re-enable it from Cloudflare after activation.
Which DNS records do I need to point a Namecheap domain at EasyWP?
Two essential records: the root record (A or CNAME, exactly as your EasyWP dashboard displays when connecting the domain — values differ per account, so never copy them from an article), and the www record. Then mail records if you use email on the domain: MX, SPF, DKIM, and DMARC. The EasyWP dashboard shows your account's exact values at connection time — copy from there, nowhere else.
Does EasyWP's free CDN conflict with Cloudflare?
Not technically: Namecheap's CDN operates from the EasyWP side itself, and Cloudflare operates as a proxy layer above everything. The usual arrangement has static-asset requests cached at whichever edge is nearest the visitor. In practice, after enabling the orange cloud you will notice most delivery passing through Cloudflare — the two layers coexist cleanly, though cache management needs a purge on both sides after major updates.
What is the correct SSL mode with EasyWP behind Cloudflare?
Full (strict). The Let's Encrypt certificate running on EasyWP is valid from a public certificate authority, which is precisely what Full (strict) validates at the origin — the stronger of the two modes Cloudflare officially recommends. Avoid Flexible (it causes redirect loops with WordPress), and plain Full works but validates less.
Is Cloudflare free to use with EasyWP?
Yes — Cloudflare's Free plan covers everything in this guide: full nameserver setup, reverse proxy, basic DDoS protection, and limited firewall rules, with no time limit and no contract. The paid tiers (Pro and up) add performance features and advanced rules that beginners rarely need — and if you are setting both pieces up together, EasyWP subscriptions start from the official plans page.
Why did DNS_PROBE_FINISHED_NXDOMAIN appear after activation?
Because the domain activated on Cloudflare before its DNS records were complete — a warning documented verbatim in Cloudflare's documentation. The fix: open the DNS page in the Cloudflare dashboard, confirm the root and www records carry your correct EasyWP values, complete anything missing, and allow minutes for propagation. Check the mail records too if mail stopped alongside.
Should I enable DNSSEC with Cloudflare?
Yes, but in the right order: disable it at the old registrar before changing nameservers (otherwise activation hangs), and after activation completes, enable it from inside Cloudflare, then add the displayed DS record at your registrar. That sequence earns you DNS signing from the new side with no conflict — free additional protection against DNS poisoning costing two minutes of setup.
The pre-close checklist
Before you call this done, walk this list item by item: the domain shows active in Cloudflare (the Success email), the essential records are complete (root + www + mail), SSL sits on Full (strict), the orange cloud is enabled for root and www, DNSSEC is re-enabled from the new side, and the site opens from a mobile network (a test outside your own network and device). With all six green, your layer is live and documented, and every major future change is followed by Purge Everything. If you are still at the hosting-choice stage rather than the layers stage, begin from the official EasyWP page — every plan includes CDN and SSL free from day one, and the Cloudflare layer stays an open option whenever your site grows into it, with steps that will bring you right back to this guide.
Sources
- Official Cloudflare documentation: full nameserver setup (dns/zone-setups/full-setup) and the detailed setup steps (last updated July 29, 2026)
- Official Cloudflare documentation: SSL/origin modes — Flexible, Full, and Full (strict) with official recommendations
- Official Cloudflare documentation: the reverse-proxy diagram in "how Cloudflare works"
- Official Namecheap EasyWP page: the free Namecheap CDN, Let's Encrypt SSL, and domain connection (verified August 22, 2026)
- Truescho internal guides: buying a domain from Namecheap, domains versus hosting, and the EasyWP beginner's guide